中文 English

Building the Mesh

This section describes the step-by-step procedure to prepare the mesh for this simulation. The mesh is created using the Vehicle Template Mesher. The settings for the mesh generation are explained in the following steps:
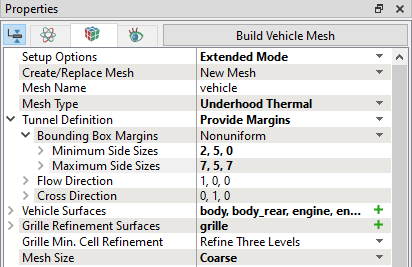
Mesh parameter
  1. Select Vehicle Template Mesher in the Mesh Panel.
  2. Select Extended Mode from the Setup Options drop-down list in the Properties Panel.
  3. Select Underhood Thermal from the Mesh Type drop-down list in the Properties Panel.
  4. Select Provide Margins in the Tunnel Definition in the Properties Panel.
  5. Under Bounding Box Margins, specify the Minimum Side Sizes as 2, 5, 0 and Maximum Side Sizes as 7, 5, 7.
  6. Select all CAD Surfaces, except fan, grille and radiator in the Geometric Entities Panel and click Add Surfaces icon for Vehicle Surfaces in the Properties Panel.
  7. Select CAD Surfaces grille in the Geometric Entities Panel and click Add Surfaces icon for Grille Refinement Surfaces in the Properties Panel.
  8. Select Coarse for the Mesh Size drop-down list.
 

Figure 17.120 - Template mesh settings

Radiator and Fan Mesh

Perform the following steps to obtain the mesh for radiator and fan:

  1. Select Heat Exchanger Template for the Add Heat Exchanger drop-down list. A set of parameters appear under Heat Exchanger.
  2. Enter radiator for Heat Exchanger Name and select CAD Surfacesradiator in the Geometric Entities Panel and click Add Surfaces icon for Heat Exchanger Surfaces in the Properties Panel.
  3. Select Blades for the Add Fan drop-down list. A set of parameters appear under Fan.

  4. Select CAD Surfaces fan in the Geometric Entities Panel and click Add Surfaces icon for the Fan Surfaces in the Properties Panel.
  5. Enter -0.4277, -1.0744e-05, 0.1604 for Centre and 0.9986, 4.44e-05, -0.0523 for Axis in the Properties Panel.
 

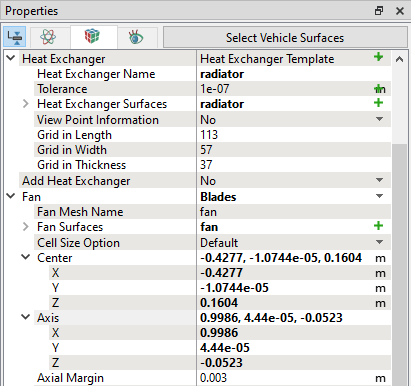
Figure 17.121 - Radiator and Fan mesh settings

Internal Volume Definition (Exhaust and Fuel Tank)

Perform the following steps to add the CHT solids of exhaust pipe and fuel tank:

  1. Select Identifying Boundaries from the Internal Volume Definition drop-down list in the Properties Panel.
  2. Select CAD Surfaces exhaust_catalytic_converter, exhaust_inlet, exhaust_muffler, exhaust_pipe_1, exhaust_pipe_2, exhaust_tail_pipe_1, exhaust_tail_pipe_2 and fuel_tank in the Geometric Entities Panel and click Add Surfaces icon for the Boundaries in the Properties Panel.
 

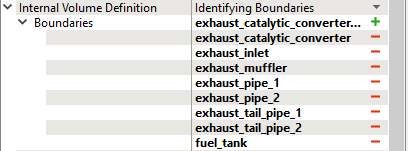
Figure 17.122 - Internal Volume mesh settings

Refinement for Exhaust and Fuel Tank

Perform the following steps to refine the surfaces further.

  1. Select Add Surface Refine Zone from the Create Surface Refine Zone drop-down list. A set of parameters appear under Surface Refine Zone.
  2. Select all CAD Surfaces with the prefix exhaust and fuel tank in the Geometric Entities Panel and click Add Surfaces icon for the Refinement Surfaces in the Properties Panel.
  3. Enter 0.0025 for Cell Size on Boundaries under Add Surfaces to Mesh in the Properties Panel.
  4. Select Refine Two Levels from the Min. Cell Refinement on Boundaries drop-down list.
 

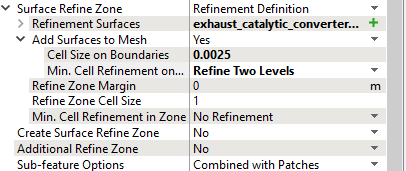
Figure 17.123 - Exhaust and Fuel Tank Refinement mesh settings
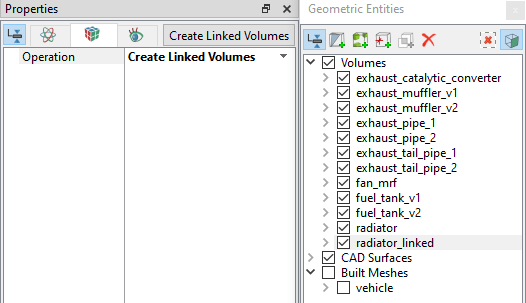
Build Vehicle mesh
  1. Click Build Vehicle Mesh. A new mesh vehicle is created under Built Meshes in the Geometric Entities Panel.
  2. The meshed Volumes exhaust_catalytic_converter, exhaust_muffler_v1, exhaust_muffler_v2, exhaust_pipe_1, exhaust_pipe_2, exhaust_tail_pipe_1, exhaust_tail_pipe_2, fan_mrf, fuel_tank, radiator and vehicle are generated under Volumes.
´ Note:  The extra volume that is created apart from the solids is the fluid volume inside exhaust.


Figure 17.124 - Vehicle front side mesh


Build Radiator Linked Volume (Coolant)
  1. Select Volumes radiator in the Geometric Entities Panel.
  2. Select Split/Combine Geometry or Grid in the Mesh Panel.
  3. Select Create Linked Volumes from the Operation drop-down list in the Properties Panel.
  4. Click Create Linked Volumes. A new mesh radiator_linked is created under Volumes in the Geometric Entities Panel.
 

Figure 17.125 - Radiator Linked volume mesh settings


Copyright © 2023 Simerics Inc.,