2.3 Running Simerics-MP/Simerics-MP+
This section gives you the procedure to run Simerics-MP/Simerics-MP+ in Windows System, Linux, and Batch run.
2.3.1 Windows System
To launch Simerics-MP/Simerics-MP+ on a Windows system, do the steps as follows:
- Click the Start button.
- Select All Programs menu.
- Select the Simerics menu.
- Select the Following
- Simerics-MP for general purpose CFD simulations.
- Simerics-MP+ for fluid machinery, automotive and marine applications with templates.
|
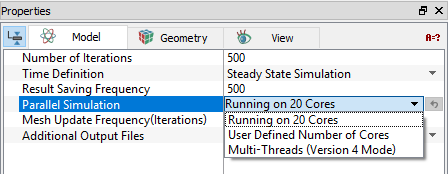
Figure 2.2 - Parallel simulation |
- Specify the number of threads
- For multi - thread mode: Set SIMERICS_PARALLEL=LOOPS
- For parallel mode: Set SIMERICS_THREADS=#number of cores
- Run the simulation
- Start from initial values: <Path of SimericsMP.exe> -run <Project.spro>
Example: "C:\Program Files\Simerics\SimericsMP.exe" -run Pump.spro - Start from existing solution: <Path of SimericsMP.exe> -run <Project.spro> <Results.sres>
Example: "C:\Program Files\Simerics\SimericsMP.exe" -run Pump.spro Pump_1000.sres - Continue from existing solution: <Path of SimericsMP.exe> -run <Results.sres>
Example: "C:\Program Files\Simerics\SimericsMP.exe" -run Pump_1000.sres - Stop and Save: The stop and save feature while terminating a job using Ctrl-C,
if a file named project_name.spro.save_and_stop exists, when running in batch mode
- Start from initial values: <Path of SimericsMP.exe> -run <Project.spro>
- To launch project using command line
The command line C:\>"C:\Program Files\Simerics\SimericsMP.exe" -? is used to avail the following options to launch/run/save as the project as shown in Figure 2.3:
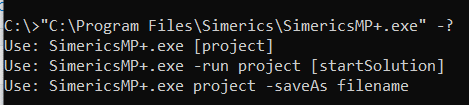
- project: To open project in GUI mode <Path of SimericsMP.exe> <Project.spro>
Example: "C:\Program Files\Simerics\SimericeMP.exe" Pump.spro - -run project [StartSolution]: As explained above in Run the simulation (Start from existing solution)
- project -saveAs filename: This command is used to write different project file name and grid file name <Path of SimericsMP.exe> <Project.spro> -saveAs <filename>
Example: "C:\Program Files\Simerics\SimericeMP.exe" Pump.spro -saveAs Pump_prepared
| ´ | Note: To run Simerics-MP+ using the command line replace “SimericsMP.exe” with “SimericsMP+.exe”. |
2.3.2 Linux System
To run the project in Linux from command prompt, do the steps as follows:
- Go to the installation folder <Path of SimericsMP>
- Execute one of the following:
- Simerics-MP for general purpose CFD simulations
- Simerics-MP+ for fluid machinery, automotive and marine applications with templates.
|
Figure 2.4 - Parallel simulation |
- Specify the number of threads
- For serial mode: export SIMERICS_PARALLEL=LOOPS
- For parallel mode: export SIMERICS_THREADS=#number of cores
- Run the simulation
- Start from initial values: <Path of SimericsMP> -run <Project.spro>
Example: "/opt/Simerics/SimericsMP" -run Pump.spro - Start from existing solution: <Path of SimericsMP> -run <Project.spro> <Results.sres>
Example: "/opt/Simerics/SimericsMP" -run Pump.spro Pump_1000.sres - Continue from existing solution: <Path of SimericsMP> -run <Results.sres>
Example: "/opt/Simerics/SimericsMP" -run Pump_1000.sres
- Start from initial values: <Path of SimericsMP> -run <Project.spro>
| Note: To run Simerics-MP+ using the command line replace “SimericsMP” with “SimericsMP+”. |
2.3.3 Batch Run
Batch runs are used to run multiple simulations on the same project file with different values of input variables. Given below is an example for batch run. In case, users do not have python, there are other ways such as a simple batch file or users can write their own script for different purposes.
- Create a base project file (.spro).
- Define and initialize the variable for Batch run in the base project file (.spro) as shown in the Figure 2.5
- Create inputFile.txt, which contains the name of the variables for the batch run and their respective values.
- Copy inputFile.txt and PLBatchGen5.py (python script) in the project folder. The python script calls inputFile.txt.
- Double click PLBatchGen5.py to start batch mode runs.
- Observe the progress of batch mode runs in command prompt window.
| Note: Ensure python 2.X is installed before using batch mode python script. |
Example:

2.3.4 Batch Scripting Commands
This section explains how to setup for batch run and list of commands used to run/open/run multiple projects. Follow the below steps to run in batch mode.
- Create a text file and specify required batch command.
- Run by specifying simerics_path -batch batchFile.txt. In Simerics HPC, it is srun SimericsMP+ -batch batchfile.txt.
- Comment (#)
- Description: Any user comments can be added into the batch file using “#”. Any text in the line after “#” is not used in the batch run.
Example: # This is an example.
- Description: Any user comments can be added into the batch file using “#”. Any text in the line after “#” is not used in the batch run.
- system
- Description: Run “system” command to copy or delete or move files.
Syntax: system <arguments passed to system environment for execution >.
Example: system cp batchfile.txt batchfile5.txt.
- Description: Run “system” command to copy or delete or move files.
- echo
- Description: Display a text on screen using “echo” command.
Syntax: echo <message to print>.
Example: echo Starting Fluid Side Simulation
- Description: Display a text on screen using “echo” command.
- run
- Description: Run new project, continuation run from existing result file or start from existing solutions using “run” command.
Syntax: run <project_or_continuation_results_file><results file to start from>.
Examples: - run fluid.spro
- run fluid_0020.sres
- run fluidFile.spro fluidFile2_0020.sres
- Description: Run new project, continuation run from existing result file or start from existing solutions using “run” command.
- open
- Description: Open project and load it to memory using “open” command. This helps in saving significant amount of time during co-simulation run. This way code does not need to load the project files at the start of each cycle.
Syntax: open <proj_id> <project_or_continuation_results_file> <results file to start from>.
Examples: -
open fluid fluidFile.spro
- open fluid fluidFile_0020.sres
-
open fluid fluidFile.spro fluidFile2_0020.sres
- Description: Run one project or multiple projects in the sequence specified, until end criterion of one of the projects is reached. Convergence in steady state case is always an end criterion. Additional end criterion is shown in examples below. User need to open the project file first to use execution (exec) command.
Syntax: exec <cycles><proj_id > <steps/iterations>
- exec 10 fluid 20
Syntax: exec <cycles> <proj1_id> <steps> <proj2_id> <steps>
Examples:
-
exec 1 fluid 5 solid 20 #Run for 1 cycle and end criterion are 5 and 20 iterations/time steps
- exec 20 fluid solid #Run for 20 cycles and end criterion is as specified in the project file
- Description: Specify results saving frequency using “results” command. If included, needs to be before corresponding exec command. If no results command is found results are saved after each cycle and at the frequency specified in the project files.
Syntax: results <number of cycles after which results will be written> <project>.
Examples: -
results 1 project #This is the default. If no results command is found in the file this is automatically included
- results 5 #Ignore save frequency in project files. Save results after every 5 cycles
-
results project #Save frequency is according to project file
- results 5 project #Save according to project file and after every 5 cycles
- Description: Close project files loaded to memory using “close” command. Project is always closed when batch script ends.
Examples: close fluid
- close solid
- Description: Set variable in scripting file, which can be accessed, while the project file is in run.
Example: set p0=101325
In expression of the project file, which is required to access p0.
inlet_p = batch.p0
inlet_p can be used in the project file as a normal expression variable now. If not specified in batch file or run outside batch mode, the variable is 0.
- In batch file, user can load multiple projects in the beginning. It uses the same set of nodes, when all the simulations running in cluster. Simulation runs one at time, when user switch one project to another project, still license will not be released, and the whole process is continued without interruption.
-
Open project and load it to memory using “open” command. This helps in saving significant amount of time during co-simulation run. This way code does not need to load the project files at the start of each cycle.
- Data exchange between different simulations, loaded in the same batch files can be done through memory and not using data files, which saves significant amount of time.