Animation
Tecplot 360 provides multiple methods for creating animations and exporting them as movie files or sequences of static images for later playback. The basic animation methods available include:
- Animation Tools
-
Using themenu, Slice Details dialog, or Streamtrace Details dialog to create animations. Animations can be viewed within Tecplot 360 or exported as movie files.
- Movie File Creation with Macros
-
Using macros to perform repeated changes and write each image to a movie file.
Animation Tools
Use built-in animation tools to have Tecplot 360 loop through data, automatically displaying zones, slices, or streamtraces in sequence. The following plot elements can be animated via thedialog in the menu:
| When a specific animation image size is required (e.g., 300×250 pixels), first resize the frame to the desired width and height, then export only the active frame. |
Time Animation
To animate over time, simply press the Play button in the plot sidebar or thedialog. (This dialog can be launched from the Animation menu or by clicking the
 button above the "Solution Time" slider in the plot sidebar.) The active frame will animate from the current time step to the last time step. The current solution time determines the transient zone displayed in the active frame. The slider control can be used to interactively change the current solution time.
| This option is only available for transient field plot data. |
The dialog contains the following options:
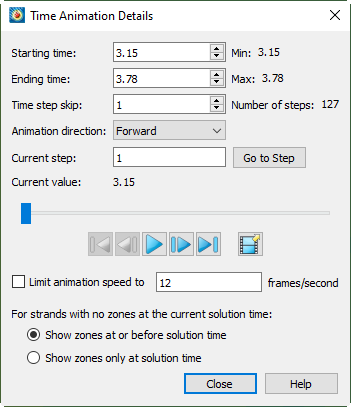
- Start Time
-
Enter the first solution time value to include in the animation. If the entered solution time does not exist, the closest solution time less than the entered value is used; if no such time exists, the first solution time is used. The default is the first solution time. The value of the first solution time in the dataset is displayed in.
- End Time
-
Enter the last solution time value to include in the animation. If the entered solution time does not exist, the closest solution time less than the entered value is used. The default is the last solution time. The value of the last solution time in the dataset is displayed in.
- Time Step Skip
-
Enter the number of time steps to skip between frames. A value of 2 means animate every other time step, a value of 3 means every third time step, and so on.
- Number of Steps
-
显示从开始时间到结束时间之间数据中的时间步数。
- 动画方向
-
选择动画方向:正向、反向、循环(重复正向)或弹跳(正向→反向→正向→反向……)。
- 当前步
-
此字段显示动画当前帧的时间步。动画播放过程中该字段会实时更新。
- 跳转至
-
使用按钮跳转到"当前步"字段中输入的动画步数。
- 滑块
-
可拖动滑块更改当前求解时间。也可使用以下按钮:
-
 - 跳转到"开始时间"的值。
 -
 - 向"开始时间"的值移动一步。
 -
- 按"动画方向"字段指定的方式播放动画。播放时"播放"按钮变为"暂停"按钮。
-
 - 向"结束时间"的值移动。
 -
 - 跳转到"结束时间"的值。
单击胶片图标将动画导出为文件。参见Animation Export。注意:此对话框中的部分设置(如方向和速度)在导出为文件时不适用。如需添加此类效果,可后续使用视频编辑器实现。
-
- 限制动画速度为
-
启用此选项可将动画速度限制为文本框中指定的值。
- 当当前求解时间下条带无区域时
-
确定在较小时间容差范围内,当前求解时间下不存在具有指定条带ID的区域时显示的内容:
-
显示求解时间或之前的区域(默认)- 显示具有该条带ID的最近先前求解时间对应的区域。
-
仅显示求解时间时的区域:仅显示当前求解时间对应的区域。
注意:除上述设置外,场图必须处于激活状态才能显示。
-
IJK平面动画
使用Used to display all or a specified subset of IJK planes in the current dataset one by one. You can choose to animate I, J, or K planes.
To animate IJK planes, select"IJK-planes" from the menu. Thedialog will then contain the following options:
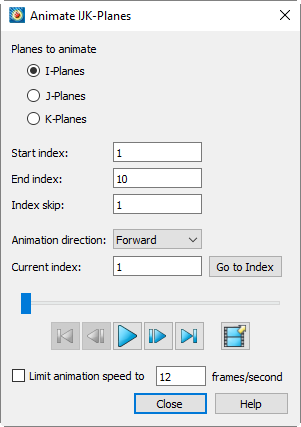
- Planes to Animate
-
Specify the set of planes to animate: I, J, or K planes.
- Start Index, End Index, Index Step
-
Specify the start index (first plane to display), end index (last plane to display), and index step in the provided fields. A step of 1 displays all indices, a step of 2 displays every other index, and so on.
- 动画方向
-
选择动画方向:正向、反向、循环(重复正向)或反弹(正向、反向、正向、反向……)。
- Current Index
-
Displays the number of the current plane index, editable. After editing, clickto jump to the selected step.
- 滑块
-
Drag the slider to change the current plane index. You can also use the following buttons:
-
- Jump to the first index.
-
- Move one step toward the first index.
-
- 按动画方向字段指定的方式播放动画。播放时,播放按钮变为暂停按钮。
-
- Move one step toward the last index.
-
- Jump to the last index.
Click the filmstrip icon to export the animation to a file. See Animation Export. Note that some of the settings in this dialog (such as direction and speed) do not apply when exporting to a file. Instead, you may add these effects later using a video editor, if desired.
-
- 限制动画速度为
-
Enable to limit the animation speed to no more than the specified value.
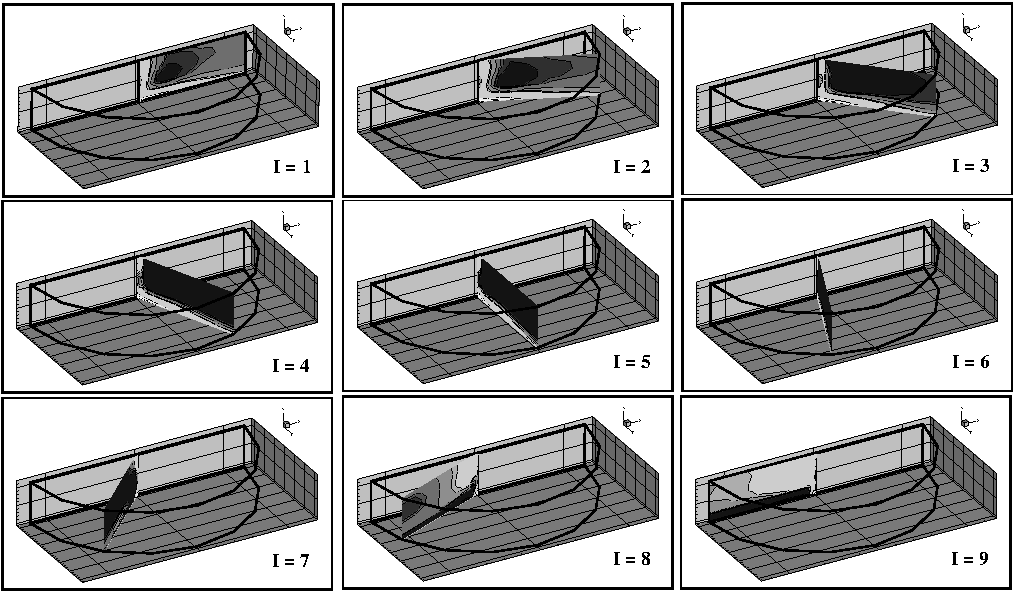
Figure 1Shows an example of animating I planes in an IJK ordered region.
| To restore the workspace to a normal view after the IJK animation ends, go to. |
IJK Blanking Zone Animation
使用The "Animation" page of the dialog box () can create a series of Tecplot 360 rendering animations, starting from an initial IJK blanking index set and gradually transitioning to the final IJK blanking index set through a series of interpolation steps.
To create an IJK blanking zone animation sequence, you must first enable the IJK blanking function using the checkbox at the top of the IJK Blanking dialog box. For more information on initially setting up IJK blanking, refer toIJK Blanking.
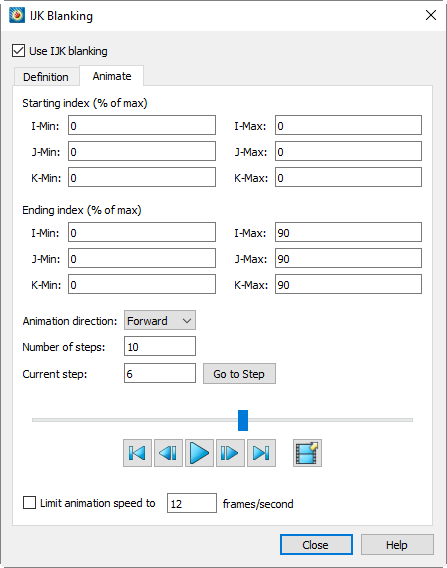
The "Animation" page of the IJK Blanking dialog box contains the following settings:
- Start Index (Percentage of Maximum)
-
Specify an initial set of blanking IJK indices in the text field. Enter the index ranges for I, J, and K (index values are entered as a percentage of the maximum index).
- End Index (Percentage of Maximum)
-
Specify a final set of blanking IJK indices. Enter the index ranges for I, J, and K respectively.
- Animation direction
-
Select the direction for the animation: forward, backward, loop (forward repeatedly), or bounce (forward, then backward, then forward, then backward…).
- Number of Steps
-
Specify the number of steps. The minimum value is two.
- Current Step
-
Displays the current step number, which is editable. Clickto jump to the selected step after editing.
- Slider
-
Drag the slider to change the current step. You can also use the following buttons.
-
- Jump to the first step.
-
– Move one step toward the first step.
-
â Plays the animation as specified by the Animation
direction field. The Play button becomes a Pause button while the animation is
playing.
-
– Move one step toward the last step.
-
– Jump to the last step.
Click the filmstrip icon to export the animation to a file. See Animation Export. Note that some of the settings in this dialog (such as direction and speed) do not apply when exporting to a file. Instead, you may add these effects later using a video editor, if desired.
-
- Limit Animation Speed to
-
When enabled, limits the animation speed to the value specified in the field.
Isosurface Animation
Use the Animation page of the dialog box to define isosurfaces for animation playback on screen or in a file. You can directly access this page from themenu by selecting "Isosurface", or fromMenu or Plot sidebar opensdialog, then click the "Animation" tab.
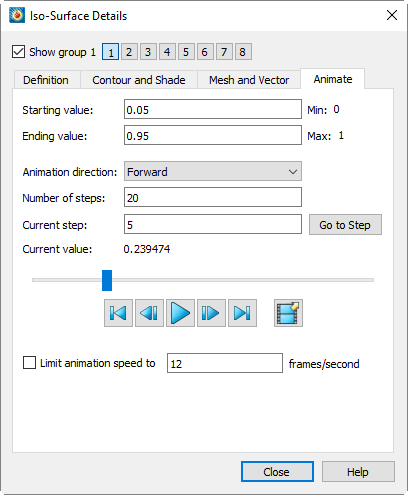
- Start Value
-
The starting isosurface value for the animation.
- End Value
-
The ending isosurface value for the animation.
- Animation direction
-
Select animation direction: Forward, Reverse, Loop (repeat forward), or Bounce (forward→reverse→forward→reverse…).
- Number of steps
-
The range defined by the Start Value and End Value fields above is divided into the specified number of animation steps.
- Current Step
-
Indicates the current active step of the animation. You can enter the desired value and click.
- Current Value
-
Displays the isosurface value for the current step.
- Slider
-
可拖动滑块更改当前步骤。也可使用以下按钮。
-
- 跳转到第一步。
-
– 向第一步移动一步。
-
â Plays the animation as specified by the Animation
direction field. The Play button becomes a Pause button while the animation is
playing.
-
– 向最后一步移动。
-
– 跳转到最后一步。
Click the filmstrip icon to export the animation to a file. See Animation Export. Note that some of the settings in this dialog (such as direction and speed) do not apply when exporting to a file. Instead, you may add these effects later using a video editor, if desired.
-
- Limit Animation Speed to
-
Enable this option to limit the animation speed to the value specified in the field.
Mapping Animation
Use the Dialog for displaying all or a specified subset (XY or polar line mappings) defined in the active frame one by one.
To create a mapping animation, from themenu, select "Mappings". dialog has the following options:
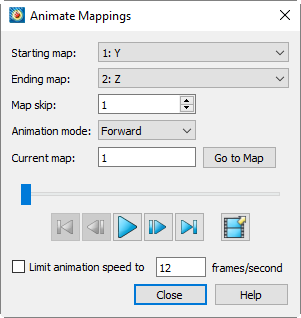
- Start Mapping
-
Specifies the first line mapping to display.
- End Mapping
-
Specifies the last line map to display.
- Map skip
-
Specifies the number of maps to skip per step.
- Animation mode
-
Select animation direction: Forward, Backward, Loop (play forward, return to start, then play forward again) or Bounce (forward → backward → forward → backward…).
- Current map
-
Indicates the currently displayed map. You can edit the value in the text box and click.
- Slider
-
The slider can be dragged to change the current step. The following buttons may also be used.
-
- Jump to the first map.
-
– Move one step toward the first map.
-
– Play the animation as specified by the Animation Mode field. During playback, the play button becomes a pause button.
-
– Move one step toward the last map.
-
– Jump to the last map.
Click the filmstrip icon to export the animation to a file. See Animation Export. Note that some of the settings in this dialog (such as direction and speed) do not apply when exporting to a file. Instead, you may add these effects later using a video editor, if desired.
-
- Limit Animation Speed to
-
To limit the animation speed, enable the checkbox and enter a frame speed value in the text box.
Slice animation
To create a slice animation, selectYou can also access this feature by opening the dialog from the menu or the Plot sidebar and selecting the Animate page.
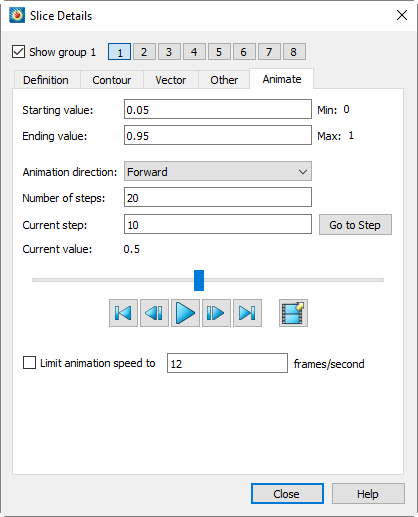
Specify the start value, end value, and number of steps in the provided fields.
| During animation, only the primary slice of the current slice group (specified on the Position page) is changed. The start slice, end slice, and any intermediate slices of the current slice group remain unchanged. The animated primary slice may overlap with the start slice, end slice, or intermediate slices. The animation continues without altering these values. |
For arbitrary slices, the start and end origin positions are specified in XYZ coordinates. The orientation of arbitrary slices is set using the normal defined on the Definition page of the Slice Details dialog (seeArbitrary Slice Orientation). The slice origin moves between the start and end origins specified here; at each step of the animation, the slice is drawn through the origin and oriented relative to the normal.
After selecting the start and end positions and the number of steps, you can use the following options to play the animation on screen or export it to a file:
- Animation Direction
-
Select whether to animate forward, backward, loop (forward, then back to the beginning for another pass forward), or bounce (forward, then backward, then forward, then backward…).
- Current Step
-
Indicates the current active step of the animation. This value can be edited to jump to a specific step. Click按钮可在工作区中显示输入的时间步。
- 当前值或原点
-
显示当前步骤中正在变化的数值(例如,X 平面切片的 X 值)。对于任意切片,显示当前步骤中切片原点(切片将通过该点绘制)的 XYZ 坐标。
- Slider
-
The slider can be dragged to change the current step. The following buttons may also be used.
-
- Jumps to the first step.
-
â Moves one step toward the first step.
-
â Plays the animation as specified by the Animation
direction field. The Play button becomes a Pause button while the animation is
playing.
-
â Moves toward the last step.
-
â Jumps to the last step.
Click the filmstrip icon to export the animation to a file. See Animation Export. Note that some of the settings in this dialog (such as direction and speed) do not apply when exporting to a file. Instead, you may add these effects later using a video editor, if desired.
-
- 限制动画速度
-
切换为开启以将动画速度限制为文本字段中指定的值。
流线动画
要制作流线动画,请选择您也可以通过从 Plot 菜单或 Plot 侧边栏打开 Streamtrace Details 对话框并切换到 Animate 页面来访问此功能。
| 当您制作流线动画时,时间标记会自动开启。您可以在 Streamtrace Details 对话框中更改这些标记的外观。有关详细信息,请参见Timing Page。 |
在页面的对话框中提供的字段中指定每个周期的步数和周期数。
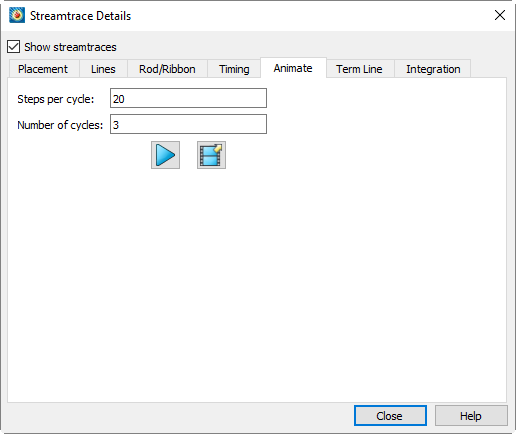
单击“播放”按钮可在屏幕上查看流线动画,或单击胶片图标将动画导出到文件。请参见Animation Export.
区域动画
要制作区域动画,请从菜单中选择“Zones”。从在对话框中,在提供的字段中指定动画模式、起始区域、结束区域和区域跳跃。
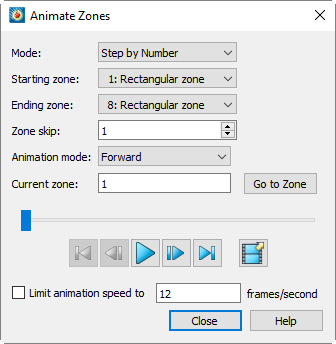
您可以将动画输出到文件或“屏幕显示”。(另请参阅Animation Export.)
Use the 下拉菜单以选择以下两个选项之一:
- 按编号步进
-
从第一个区域到最后一个区域对所有区域进行动画处理,跳跃值由“区域跳跃”字段指定。区域跳跃为1时将对所有区域进行动画处理。
- 按编号分组步进
-
按组(由“组大小”字段指定)对区域进行动画处理。例如,组大小为2时,将以2个区域为一组进行动画处理(即区域1和2,接着区域3和4,依此类推)。
以下字段也可用:
- 起始区域
-
动画中的第一个区域。
- End Zone
-
The last zone in the animation.
- Zone Skip or Group Size
-
The label for this field changes based on the setting of the "Mode" dropdown menu described earlier. Determines the increment for switching zones (for "Step by Number") or the size of the zone group (for "Step by Number Group").
- Animation Mode
-
Select whether to animate forward, backward, loop (forward, then back to the beginning for another pass forward), or bounce (forward, then backward, then forward, then backward…).
- Current Zone
-
Indicates the currently displayed zone. This field can be edited to jump to a specific zone; click "Go to Zone" after editing.
- Slider
-
The slider can be dragged to change the current step. The following buttons may also be used.
-
- Jump to the first zone.
-
– Move one step toward the first zone.
-
– Plays the animation as specified by the Animation Mode field. The Play button becomes a Pause button while the animation is playing.
-
– Move one step toward the last zone.
-
– Jump to the last zone.
Click the filmstrip icon to export the animation to a file. See Animation Export. Note that some of the settings in this dialog (such as direction and speed) do not apply when exporting to a file. Instead, you may add these effects later using a video editor, if desired.
-
- Limit Animation Speed
-
Toggle on to limit the animation speed to the value specified in the text field.
| The "Animate Zones" dialog is not applicable to transient data sets. |
Creating Movie Files with Macros
The Tecplot macro language extends standard animation capabilities. Macro commands allow you to perform any interactive operation—and even more. You can also use loops to repeatedly rotate 3D objects, cycle through active zones, etc., to create your movie. SeeMacrosfor more information on the Tecplot macro language.
A typical macro file format for creating movies is as follows:
#!MC 1410
... optional commands to set up the first image
$!EXPORTSETUP
  EXPORTFORMAT = AVI
  EXPORTFNAME = "mymovie.avi"
$!EXPORTSTART
  EXPORTREGION = CURRENTFRAME
$!LOOP 50
  ... commands to set up next image
  $!REDRAWALL
  $!EXPORTNEXTFRAME
$!ENDLOOP
$!EXPORTFINISH
For example, the following macro file can be used to animate zones:
#!MC 1410
#
# Set up Export file type and file name.
#
$!EXPORTSETUP
  EXPORTFORMAT = AVI
  EXPORTFNAME = "C:\temp\timeseries.avi"
#
# Begin Animating
#
$!LOOP |NUMZONES|
  #
  # The |Loop| variable is equal to the current
  # loop cycle number.
  #
  $!ACTIVEFIELDZONES = [|Loop|]
  $!REDRAWALL
  #
  # This series of $!IF statements ensures
  # that a new AVI file will be created when
  # the macro is started.
  #
  $!IF |Loop| == 1
    $!EXPORTSTART
      EXPORTREGION = CURRENTFRAME
  $!ENDIF
  $!IF |Loop| != 1
    $!EXPORTNEXTFRAME
  $!ENDIF
$!ENDLOOP
$!EXPORTFINISH
Advanced Animation Techniques
Text Changes
Sometimes you may need to include information in the animation to show the viewer the time step, current zone, or mapping. There are two ways to achieve this.
Using Dynamic Text
The best approach is to add dynamic text in a text box. SeeDynamic Text.
将文本附加到区域
此方法在您对区域进行动画处理时效果最佳。首先,在数据文件中创建多个文本字符串,并使用ZN=参数
ZONE T= "Temp. distribution, Distance = 0.5 m" I=51, J=51 F=POINT
.
.
.
.....list of variable values........
.
.
.
TEXT X=70, Y=90, T= "Distance = 0.5 m", F=COURIER, CS=FRAME, H=2, ZN=1
ZONE T= "Temp. distribution, Distance = 1.0 m" I=51, J=51 F=POINT
.
.
.
.....list of variable values........
.
.
.
TEXT X=70, Y=90, T= "Distance = 1.0 m", F=COURIER, CS=FRAME, H=2, ZN=2
您还可以使用 Tecplot 360 的动态文本功能(请参阅Dynamic Text)将区域名称插入到文本字符串中。例如:
ZONE T= "Distance= 1.0 m" I=51, J=51 F=POINT
.
.
.
.....list of variable values....
.
.
.
TEXT X=70, Y=90, T= "&(ZONENAME:2)", F=COURIER, CS=FRAME, H=2, ZN=2
多帧动画
多帧中绘图的同步动画需要使用宏。宏可以使用$!FRAMECONTROL命令在帧之间切换。以下模板演示了如何在每个帧包含类似绘图的布局中实现此操作:
#!MC 1410
##Set the number of images (movie frames) in the animation.
$!VARSET |NumCycles| = 10
$!EXPORTSETUP
  EXPORTFORMAT = RASTERMETAFILE
  EXPORTSETUP EXPORTFNAME = "2frames.rm"
  BITDUMPREGION = ALLFRAMES
.
.....Insert commands to set up first frame, if necessary.
.
## Outer loop
$!LOOP |NumCycles|
  ## Inner loop cycles through each frame in the current layout.
  $!LOOP |NumFrames|
    .
    .....Insert commands here to change the plot in the active frame.
    .
    ## Push the top (active) frame to the back.
    $!FrameControl MoveToBottomByNumber
      Frame = |NumFrames|
    #
    ## Activate new top frame
    $!FrameControl ActivateTop
  $!EndLoop
  $!IF |Loop| == 1
    $!EXPORTSTART
      EXPORTREGION = CURRENTFRAME
  $!ELSE
    $!EXPORTNEXTFRAME
  $!ENDIF
$!ENDLOOP
$!EXPORTFINISH
动画导出
当您在包含动画选项的对话框中选择将动画导出到文件时,将出现“导出”对话框。从对话框顶部的菜单中选择所需的导出格式,然后根据需要设置选项。提供两种不同类型的导出格式:
-
影片格式(例如 mpeg-4),可为给定动画生成单个文件。
-
序列图像格式(例如 png 等),可为给定动画生成一系列静态图像文件。请参阅Sequenced Image Files.
大多数可用格式共享一组类似的选项,此处将对这些选项进行说明。
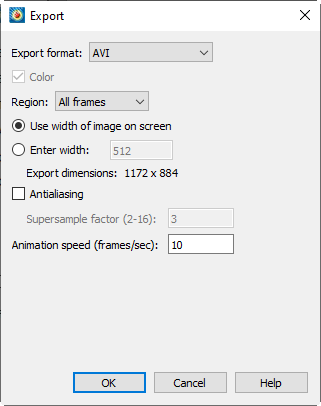
- 区域
-
选择要动画化的工作区区域。
- 当前帧
-
仅捕获活动帧。
- 所有帧
-
捕获包含所有帧的最小矩形区域。
- 工作区
-
捕获工作区。
- 使用屏幕上的图像宽度
-
选择此选项可生成与当前屏幕绘图大小相同的图像文件。
- 输入宽度
-
选择此选项可指定生成图像的宽度(以像素为单位)。较大的宽度可提高图像质量,但指定的宽度越大,导出图像所需的时间越长,导出的文件也越大。
- 抗锯齿
-
选择此选项可平滑图像中的锯齿边缘。图像会以高于最终显示分辨率的分辨率进行渲染,然后缩小尺寸。
- 超采样因子
-
控制图像中使用的抗锯齿程度。该数值越高,用于抗锯齿的临时图像越大,所需时间也可能越长。
- 动画速度(帧/秒)
-
在文本字段中输入一个值,以设置动画的帧速率(帧/秒)。
以下部分描述了特定格式的独特设置,并提供了每种格式的附加有用信息(参考、查看器等)。
Performance Tips
如果导出时间异常长,或收到无法导出动画的错误消息,最可能的原因是尝试导出的图像宽度过大。选择较小的宽度可大幅加快导出过程。请注意,抗锯齿会将图像的宽度和高度乘以输入的超采样因子,因此选择较低的因子也能加快导出速度。
对于尺寸为长度 x 宽度、超采样因子为 SSF 的导出,未压缩真彩色帧的大小约为 长度 x SSF x 宽度 x SSF x 3。导出此类帧所需的内存可能高达此值的两倍。
AVI 文件
AVI 格式是 Windows 平台较旧的视频格式,与 Windows 应用程序广泛兼容。以下是一些可用于查看和/或编辑 AVI 文件的应用程序:
- Windows Media Player
-
Windows 发行版中包含的标准电影查看器。更多信息请访问support.microsoft.com/en-us/windows/windows-media-technologies-ebf04fdc-dc47-9944-c160-ae22d8413116
- QuickTime
-
Mac 自带的 Apple QuickTime 可以播放 AVI 文件,并根据需要将其导出为其他格式。
- VideoLan Client (VLC)
-
免费播放器,支持多种视频格式,包括 AVI,适用于 Windows、Mac、Linux 及其他多个平台。www.videolan.org/vlc/
- Adobe® Premier®
-
一款强大的专业数字视频编辑工具。更多信息请访问www.adobe.com/products/premiere.html.
Flash 文件
Adobe® Flash® 指用于交互式Web内容(包括动画和影片)的"小型Web格式"(SWF)。Flash文件的扩展名为.swf并被称为SWF文件。
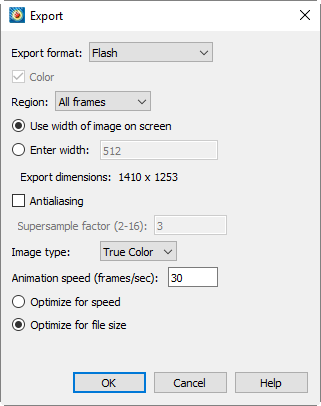
以下选项为Flash文件特有。关于所有支持导出格式的通用选项,请参阅Animation Export.
- 图像类型
-
选择图像类型。可选选项包括:
- 真彩色
-
选择此选项可创建采用无损(ZLIB)压缩的24位图像。
- JPEG
-
选择此选项可创建采用有损压缩的24位图像。生成的文件比真彩色更小,但图像质量较低。
- 256色
-
选择此选项可将每幅图像缩减为256色,并使用ZLIB进行压缩。
- 速度优化
-
对于真彩色或256色图像类型,选择此选项可尽快生成输出。这会降低压缩级别,导致文件体积增大,但不影响播放速度。
- 文件大小优化
-
对于真彩色或256色图像类型,选择此选项可生成尽可能小的文件。此设置不影响播放速度。
MPEG-4 文件
MPEG-4是现代ISO视频播放标准。MPEG-4文件可通过多种计算机软件、便携设备和机顶盒播放。我们建议:
- QuickTime
-
随Mac附带的Apple QuickTime可播放MPEG-4文件,并根据需要将其导出为其他格式。
- Windows Media Player
-
Windows系统自带的标准视频播放器。更多信息请访问support.microsoft.com/en-us/windows/windows-media-technologies-ebf04fdc-dc47-9944-c160-ae22d8413116.
- VideoLan Client (VLC)
-
支持多种视频格式(包括MPEG-4)的免费播放器,适用于Windows、Mac、Linux及其他多个平台。www.videolan.org/vlc/
MPEG-4导出除适用于所有动画导出格式的通用选项外,无其他特殊选项;请参阅Animation Export.
Windows Media (WMV) 文件
Windows Media Video (WMV) 文件广泛受 Windows 应用程序支持,包括 Windows Media Player 和 Microsoft Office(PowerPoint 等)。在 Macintosh 电脑上也可通过微软免费的 Windows Media Components for QuickTime 播放。
WMV 导出除适用于所有动画导出格式的通用选项外,无其他特殊选项;请参见Animation Export.
光栅图元文件
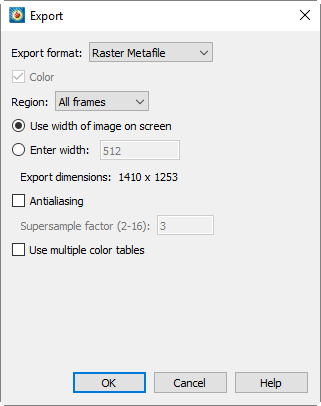
Raster Metafile 是 NASA 定义的标准格式,用于存储位图图像,可包含一个或多个图像,因此可用于动画。该格式定义于以下参考文献:
Taylor, N., Everton, E., Randall, D., Gates, R., and Skeens, K., NASA TM 102588, Raster Metafile and Raster Metafile Translator. Central Scientific Computing Complex Document G-14, NASA Langley Research Center, Hampton, VA. September, 1989. |
Raster Metafile 仅支持 256 色图像(Tecplot 360 会自动选择最佳颜色)。与导出为真彩色格式相比,包含多种颜色的绘图在导出为 Raster Metafile 时可能效果较差。使用 Raster Metafile 导出带有透明度或平滑颜色渐变的动画可能导致图像质量不佳。
When you selectRaster Metafile in the dialog box, you will have the following additional options:
- Use Multiple Color Maps
-
Select this check box to create a Raster Metafile with an independent color map for each step of the animation. If this check box is not selected, Tecplot 360 will scan all steps of the animation and create a single color map for the entire animation. Multiple color maps can improve the image quality of each step in the animation, but may cause flickering during playback.
Sequential Image Files
When using the sequential image format, Tecplot generates separate image files (e.g., png, tiff, etc.) and appends a sequence number after the base file name. For example, if the output is specified as "mymovie.png", the following files will be generated:
mymovie_000001.png
mymovie_000002.png
... and so on.
Note that each time you export an animation as sequential image files, the files will be numbered starting from 1 and incremented sequentially. This is true even if you are performing a J-Planes animation and the starting J-Plane is not 1.
The image file formats available when generating an animation include: BMP, JPEG, PNG, and TIFF. All settings for these formats when creating an animation are the same as those available when exporting a single image (via the File/Export dialog box). Please refer to the corresponding sections for each format:
BMP:BMP Export
JPEG:JPEG Export
PNG:PNG Export
TIFF:TIFF Export